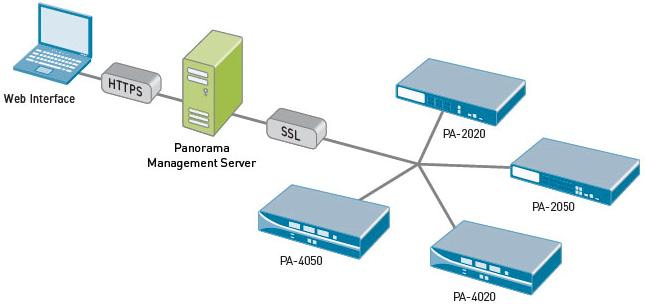
Panorama is a virtual appliance available from Palo Alto Networks that provides visibility and controller over multiple PAN next generation firewalls. All logs and content data get bubbled up into an aggregate view. Reports are based on that aggregate view – all activity from all firewalls on one report. This feature is licensed separately from the firewalls themselves.
This is a high-level overview of the architecture:

The Panorama GUI looks almost exactly like the traditional PAN GUI, which means a very small learning curve to get started with centralized visibility and control of your PAN environment.
You get 3 benefits:
- Centralized device and policy management of multiple Palo Alto Network firewalls
- View applications, users and content flowing across multiple Palo Alto Network firewalls
- Complete device management in a secure manner from a central location -- CLI or GUI are both included
With Panorama and a network of Palo Alto Networks firewalls in place, you can deploy global or local policies to block bad applications, protect the business applications and promote the secure use of end-user applications.
Panorama is a VMware image, purchased separately from the firewall itself, downloadable from the Palo Alto Networks support site. To install:
- Register the Panorama serial number on the support site.
- Download Panorama image zip file from the download page. Unzip the file.
- Open vCenter or your vSphere management interface of choice, and deploy the Panorama OVF on a thick provisioned disk.
- Use a 4GB maximum RAM limit if you have 10 or more managed firewalls.
- Use a quad core CPU for the best performance, especially with high logging rates.
- Use RAID 1/0 for the logging virtual disk for better write performance. The drives can be optimized for sequential writing of a small number of large files.
- Network based storage introduces latency and should be avoided when there are high logging rates.
- Start the virtual machine and login to the virtual machine’s console using the default login credentials.
- Configure the networks settings at the CLI and commit the changes.
- Login to the GUI with your browser using the default login credentials.
- Change the admin login/password.
- Assign the serial number, configure time/NTP, and import or generate a SSL certificate.
- Add the firewall’s serial numbers for the devices to manage.
- Commit the changes and you’re good to go.
Once you can see the devices, you can define a set of devices that are treated as a unit when applying policies: Panorama > Device Groups. From there, you can see which device configurations are out of sync. With caution, you can “commit all” next to each device in Panorama. I say ‘with caution’ because interesting things can happen with security policies and other configuration tidbits that are slightly askew (e.g. upper case vs. lower case, etc.).


